Friday, December 16, 2011

Day Two of Dis-assembly

So I didn't get enough of tinkering in the garage the other day and the bike wont strip itself so here is some more of my destruction.

The rear tire came of quite easily after taking off the rear brake caliper and the 3 bolts on the final drive. If you are attempting this you'll want to use a regular box end wrench in order to get in tight enough to the drive line. I have been using my GearWrench ratcheting wrenches for almost everything on the bike but the final drive bolts are too tight against the column.

Here is the rear wheel off the bike and the final drive hub:


Again to the front, I removed the air filter box and packed a clean rag into the intake on the carbs to keep things from falling in it.


I loosened the motor mount and attempted to take off the fuel tank.


As you can see in the picture, the Goldwing was built around the fuel tank. It seems that mother Honda wanted more then anything to make sure that it had a huge fuel tank nestled tightly at the heart of the Goldwing. This could easily be an engineering marvel equal to the Great Wall of China or the Sphinx. There is only one bolt holding the massive 5 gallon tank in place. The rest of its support is provided simply by being wedged into the frame. As you can see the tank bulges to fill every possible void of space on this bike.

On the right hand side of the tank there is a drain bolt. I figured that this would be a good idea before removing the petcock and attempting to get this tank off the bike. What I didn't realize was that the tank in mention was nearly full. I must have drained about 4 gallons of skunky orange gasoline out of the tank. Here is a last of what I couldn't fit in old Anti-freeze jugs to be saved and used as 'Boy Scout Water'.


The end result looks like this:


I ended up running to the local grocery store to by a bag of cat litter to soak up all the fuel that spilled while I was draining the tank. As it turns out the fuel will drain along every surface of the bike before falling to the bucket or floor below. With almost 4 gallons in buckets I probably had another gallons worth on the ground.

I've come to the conclusion that the tank was never designed to be removed and that I should continue to the front forks or the motor. I've tagged a lot of the lines and will need to do the same with the electrical. I am going to map the cables with pictures so I get them back to where they need to be routed when I go to put this little beauty back together. Lucky for me I have her big sister right there to use as a reference.

Long Awaited Update

Now that the '78 Goldwing and I have had a little time apart it is time to get reacquainted. I left this project with cleaning up the rear fender's chrome. I removed the entire fender and rear shocks. I started buffing the rust off the chrome and then decided that it would have all winter to rust again. So, I just buffed it up with Eagle One and will leave it until spring. The shocks came off very easily however I broke both of the air lines taking them off because they were so cold and brittle. Just as well. One of the lines had a hole in it and they would need to be replaced anyways.


Moving forward, I next removed a lot of the wiring and the coolant lines in order to remove this large hunk of metal that everything hooks to. That is the technical term for this piece:


Next came off the hand controls and the handle bars. I am considering changing out the OEM handle bars for drag bars. It is a little challenging to find 7/8" drag bars.


This is the resulting mess that will be left behind for another day.

Saturday, November 5, 2011

I've Been Thinking....

...and in honor of deere old Dad, I've decided to redo the naked wing like this:


Ya right! But I will admit that they did a great job with it. I would love to see the John Deere Goldwing in person.

Monday, August 1, 2011

On To Lights

I really want to change out the Honda factory lights on the '78 Goldwing. Anyone who has seen them know how big and chunky they are. I would like to streamline the rear fender with a mini tombstone tail light. It is suppose to be a universal fit and the reviews that I have read say that it mounts up nicely and looks good. I wished that I could find it with a red lens however. I think that all the lenses should match. All colored or all clear.


Turn signals on bikes can either be painted or chromed and I think that both look good. For my naked '78 goldwing I like the smooth bullet style signal lights and I prefer chrome for this bike. I also prefer smaller lights. Not dangerously small but noticeably small.

I am looking at the Biker's Choice Smooth Bullet Marker Lights. They come in both red and amber lenses and have about an inch and a half face in diameter. That is about half as large as the Honda OEM marker lights. They have a dual filament bulb and should work well for a lower profile signal light.

The front signals will be mounted on either side of the Honda emblem under the headlight. Originally they were mounted up along side the headlight. The rear lights will be mounted midway back on the fender where the seat will end. The cage for the hard bags and trunk originally mounted there and the rear signal lights were coupled with the tail light and licence plate.

Speaking of the licence plate I want to move it down to the left side just behind the shock on a sideways plate mount. Something like this.
This is the Kuryakyn vertical mount and runs about 100.00 dollars. The nice thing is it is lighted already.

This one is a lot more simple but I would need to add the lights below to make it legal. This placard is about $70.00 and the lights another $30.00. After that and the time to put it together it would be well worth the money for the Kurakyn frame.

Sunday, July 31, 2011

A Few Pieces of Chrome

So naturally I've been scouting some bling for the Naked Wing. I personally think that you can have too much chrome. With that being said, there are a few pieces on every bike that should be chromed. (unless it's an outlaw of course)

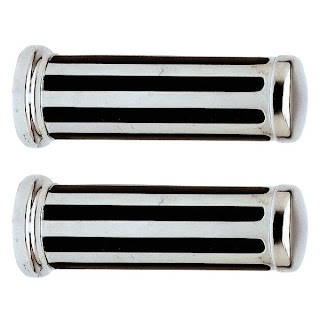
First the grips. I have these same grips on my Bleubells CM400T. I have been very impressed with how they've held up and they are also quite comfortable. The Rubber inlays are very durable but don't offer any cushion. I'm not old enough that I really care about that yet anyways. These will for sure be the grips on the '78 Goldwing.
The second thing that must be chrome are the mirrors. Plastic stem and mirrors were designed for dirt, sport or touring bikes. Not cruisers. There are a myriad of mirror styles. (little play on words there, ha ha) Some are really cool and other are really out there but which ever you choose it must fit the style of the bike. Example. Flames=flames, Maltese Cross=Maltese Cross, etc... If you don't have any elements of the mirror on the rest of your bike it looks a little silly. I do believe that the opposite is true as well. You can have too many flames, crosses, dolphins or whatever your theme is. A safe bet is to keep it simple. You lose a little originality but make up for it in class. Oval is pretty standard but look good on most all bikes. These are chromed, not billet and i think they look pretty good. (At the end of the day, my opinion is the only one that matters.)

Now lastly, chrome is not needed here but on older bikes I think it is acceptable to spice up what would otherwise be a dark cavase of an engine, cable covers. Now I have heard that they can be really cheap and aren't worth the time but I am considering them in the gold color for a select few cables on the bike. I am thinking mostly of those down buy the engine itself. Not to hot on them up by the controls. I'll need to look at the bike again and see where in any where that I'd really like them.

Friday, May 13, 2011

Fantastic Sticker Remover


I kept thinking about how I was going to get the factory spec decals off the chrome without scratching it up. I knew that Oops! gum remover worked wonderfully but I couldn't keep it on the sticker long enough to penetrate the glue.

I thought about soaking a rag then holding it in place. That would take a lot of Oops! but, if I could keep a small amount on the sticker for an extended period...

Alas! If I placed one square of toilet paper, folded in half, on overlapping pieces of packing tape....then soaked the paper and placed it over the sticker....sealing the sides....much like a bandaid....then let it sit for a little while....

The result:

I was able to remove the sticker by peeling up the edge with a knife blade and then simply pulling it off. I wet the bandaid a second time and reapplied it to the gummy residue and let it sit another 10 minutes or so and it softened right up. I cleaned off the remaining glue. buffed the area with Nev'r Dull and had one nice looking rear fender remaining.

Wednesday, May 11, 2011

Brainstorming Designs - First Draft

Below are three bikes that I really like and have given me some ideas of what I would like to do to my '78. The first picture just shows that the old gal could look really good with very little modification. Outside of a new seat, paint and pipes this bike is factory direct. (minus a few bolt on accessories.)

One thing that I really like from this bike is the burgundy paint around the radiator. Burgundy is the original accent color on the Goldwing emblems. I like it so much in fact that I've thought about powder coating the frame burgundy. My inspiration? This little cafe racer below. Now cream isn't my favorite color but it looks nice on this bike. The owner painted some of the chrome trim cream as well as the final drive and center stand. I wouldn't go that far with the burgundy. Just the frame. I also think that burgundy is dark enough that it wouldn't pop as loud as the cream does on this bike. A more subtle pop is what I'm after.

I've included this wing called Porter's Wing just because I like the way it looks. Almost completely factory to include the lights and handle bars, but has a very nice line to it. (I'm not making a joke about the paint either) The bike seems to flow well. Again you see the Corbin seat that was on the first bike, which I am becoming very fond of. You'll also notice that it has the Jardine Rumbler exhaust with slash cut pipes. This is the same style that I would like to put on mine.

Finally I've included a picture of what I want the paint to look like. Mother Honda was almost trade marked by her pin striping in the late 70's early 80's. The Goldwing already has a boxier shaped tank and the factory striping draws a definitive line making it even more square. You can see on Porter's Wing that the paint with out striping makes a drastic change in the apparent shape of the tank.

I would like to use the double gold(one gold flame and a second ghost flame) flames by Jim Munroe to accomplish the same effect. If you zoom in on the picture you'll see that the flames are also accented in burgundy. Coincidental? Maybe but, happily so.

Wednesday, May 4, 2011

Eagle One


I was puttering around with the naked Goldwing tonight and tried to buff of some of the oxidation from the front forks. I broke out the Eagle One nevr-dull wadding polish and started on the lower left fork. In no time at all, 30-60 seconds, the oxidation was coming off so quickly that it soaked through the wadding and made it completely black. It stained my hands. I buffed for another minute then wiped the fork down with a cotton rag. The results, quite nicely polished aluminum.

Oxidized

Polished

Here is the rear fender with the tail light removed. There was a fair amount of surface rust on it, especially in between the tail light and the fender. Again, a little Nevr-dull wadding, a little elbow grease and voila... 33 year old chrome looking very nice.


When I get a little more time I'm going to really get after the forks, valve and timing covers and anything else aluminum or chrome. I'll only do it once but I'll be sure to take a picture after for proof.

Tuesday, March 22, 2011

Kiwi. Not just for shoes.

This could be Kiwi's new catch phrase. They are really missing out on a chunk of the market by not advertising to the Goldwing population.

I had just a little time this evening to play with the bike and have been thinking about cleaning up the tank cover for some time now. So tonight I did just that. I pulled the cover off the other day and thought that it would look really good if it were clean. The leather is in good condition. If it weren't I would peel it off and have it painted instead.

While talking to my dad about how to condition the leather, we discussed using mink oil or Dubbin, and then Dad suggested using black Kiwi. Now I learned a thing or two about Kiwi while at Basic Training for the Army. I got in 10 years before the suede boots so I spent a lot of late nights sitting in the stairwell spit shining boots.

I pulled out my now quite complete shoe shining kit and when to work on the cover. 30 minutes later, this is the result:

I think that the leather look will be nice on the bike. It will preserve some of the original Goldwing as well as add a touch of character that not many bikes have now. Every biker wants to have something that makes him different from the rest. Anyone can go buy a factory bike and look like every other poser. A real biker wants to stand out and express himself with his bike. He doesn't even care if anyone else likes the way it looks. And why should he? It's his bike. Not theirs. That is what really makes them cool.

With that being said, here's my ride.

Sunday, March 20, 2011

Wires, Wires Every Where...

Yesterday morning I started thinking about what kind of mess I was going to find myself in trying to get all the wiring straight on the naked bike. I printed a wiring diagram that I downloaded from www.goldwingdocs.com. (fantastic site for Wingers) I looked it over for some time, and kept thinking how nice it would be to have my brother there to help, before venturing out to the garage.

Not knowing were to begin, I started unbolting everything that might be in the way of seeing wires. I traced several of them to get an idea of where things were going and put the battery on the charger so it would have enough juice so I could test the circuits.

There were two giant bird's nests of wires. One on the front that was tied into the fairing and a second on the rear end that went to the trailer and trunk lights. I started at the battery and unplugged all the axillary power wires that the previous owner had connected for various accessories.

Whoever wired in the fairings did a good job to preserve the original wires and harnesses. The fairing wiring was spliced into the original wires so all I had to do was expose the connections and cut off the newer wiring. Here is a picture of the final product.

I was pleasantly surprised to find out that the front light housing was still wired and circuits were connected. I used a 12V light probe to test them. A little later that afternoon I pulled the headlight out of the fairing and placed it in the housing. It worked fine but I still need the chrome casing to finishing mounting the light.
The rear end was equally simple and I had a new found confidence from my previous success. The original connections were still intact under the seat and after chasing a few wires I found that I could pull everything that wasn't in a heat shrinked coating out of the bike. Tail and brake lights both work properly and the signal light wires lit up the tester.

While I was at it I buffed some of the rust off the rear fender with Eagle One Never Dull chrome polish. The rust spots were superficial and buffed right off leaving a nice chrome fender behind. I used a little Ronsonol lighter fluid to try and soften up the factory decal. It took some of the ink off but the sticker remains. I'll have to find a better product to remove that one.

I tried to remove the exhaust pipes as well. I soaked the rust covered bolts in WD-40 and after using a 16 inch cheater pipe on my allen wrench was able to break the right side loose. The left side was so packed with dirt and rust that I couldn't get the wrench in it. I was able to get a #30 torx head in it but it wouldn't give and I feared that I might strip it out. At that point I called it a day. Here is the aftermath.

Pile of wire and tape

A second pile of wire and the horns out of the fairing

The big picture
(how do you like my creeper?)

Tuesday, March 15, 2011

First Ride of the Season

We had beautiful weather today so I decided that it was time to pull the Wing out of hibernation. On my lunch break I went out to the garage and put the battery tender on the Wing. I had it on bleubells. I cranked it a few times and it seemed like it wasn't getting any fuel. I checked the fuel gauge and found that it was empty. Even on reserve it wouldn't kick over. I poured the one gallon spare can from the side compartment into the tank and added a little Sea Foam.

I cranked it a few more times to start the fuel though the system and then gave it a shot of ether. The bike would burn the prime but it wasn't quite ready to start before I had to return to work. I left the tender on to charge the battery back up from all the cranking and went back to work.

After work I went back out to the garage and cranked it one more time before giving it another shot of ether. It took the prime and started sucking fuel. I played throttle jockey for a few minutes until the idle smoothed out and then decided that it was time to go fuel it up.

When I got to the gas station I looked at the odometer and realized that I hadn't fueled it since we returned from Las Vegas last fall. I topped of the tank (about 3.5 gallons) and rode it around for a few miles.

Everything seems to be working just like last season when I garaged it. The clutch still needs work and after the bike warmed up I remembered that I needed to replace the coolant reservoir. (I started to smell antifreeze) Overall, it was a pleasant ride and I was quite impressed that the bike was running so well.

I'll try to get out again this weekend.

Saturday, February 26, 2011

Oh Happy Day

Last night I was web surfing for Wing parts and fenders, handle bars, seats, pipes, etc... that might look good on a Wing cruiser. I woke up this morning as was thinking to myself, 'I would really like to spend a day, a warm day, in the garage working on the bike. That would be a good day.'.

My first pleasant surprise of the morning was that it was actually fairly nice outside. I decided that I would just go out to the garage and look the bike over and try to get some ideas. As I got looking I realized that the trunk would come off really easy. So, I took it off. I liked the look of the bike with all the plastic off the rear end.

I next wondered what it would look like without the fairing. When I looked closer I found my second and most happy surprise of the day. Underneath the fairing was a headlight housing. I was worried about how I would find a replacement housing and taking the forks apart and running wire and.... surprise! There is already everything you need right here. Glorious.

Four bolts, eight hose clamps and a few snipped wires later, the fairing is off and I get my first look at a naked Goldwing. I must admit. I like it.


I think that I can keep the rear fender and handle bars. I will replace the giant tail light with something that fits the curve of the bike better and get new exhaust pipes and a thinner seat. I'll have to find some good looking turn signals for both the front and back and I think it might look good with the three headlight cluster, although they are expensive.

I'll need to put the highway bars back on and do a little work on the engine; oil change, replace coil, fix air line for the air ride shocks. I did find out that there is a K&N air filter in it and it has a sticker under the seat for the last oil change. The previous owner did try to take care of the bike.

I'll take off the panels and the air dam for the radiator and have them painted. Now, what color and design?

Tuesday, February 22, 2011

Valkyrie?

I have been looking at customized Wings and I think that I want to put a Valkyrie rear fender and seat on the Wing. I don't think that it would take a lot to make the Goldwing look like a Valkyrie cruiser.


This is what I had in mind.